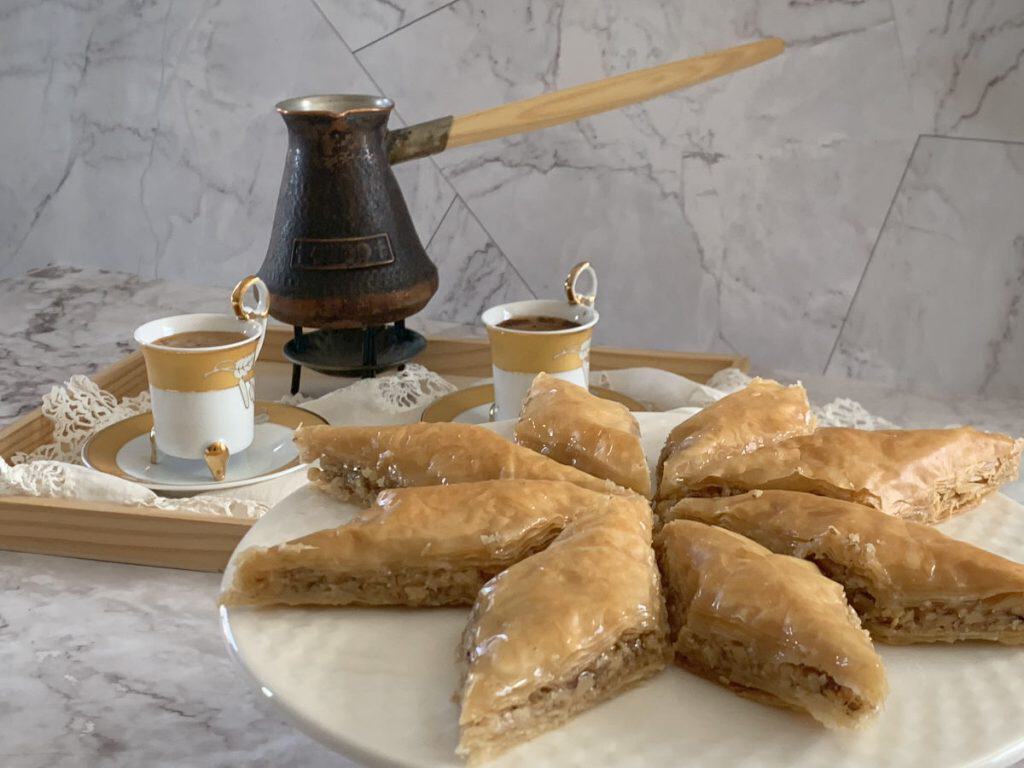
Armenian Pakhlava – Walnut Pastry with Honey Syrup (Tertanoush)

This post may contain affiliate links. As an Amazon Associate, I earn from qualifying purchases. See my Affiliate Disclosure .
Pakhlava – known to Armenians as tertanoush – is one of the most recognizable confections in the Armenian pastry tradition. Thin sheets of phyllo dough are layered with a spiced walnut filling, soaked in honey syrup, and cut into the diamond shapes that have become its signature. This gem of Armenian patisserie might sound challenging, but I’ll guide you through creating pakhlava with detailed tips to help you craft your own stunning confection. Whether you’re celebrating a holiday or simply want to master this iconic dessert, this recipe will walk you through every step.
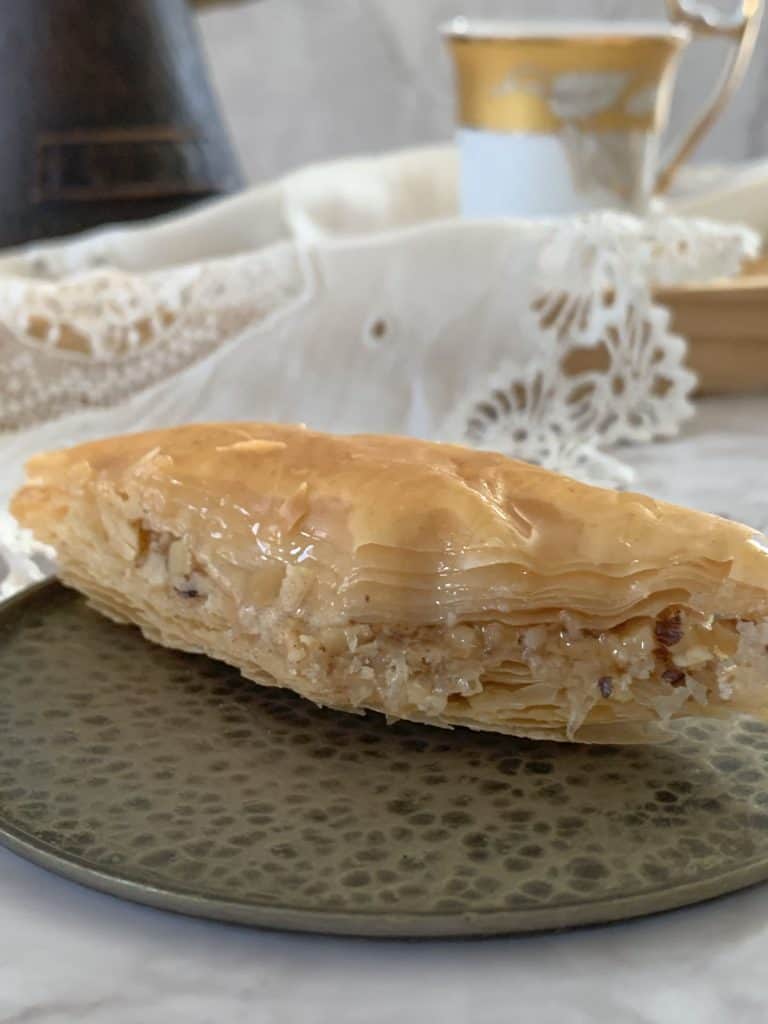
Pakhlava is a layered nut-and-honey pastry made with phyllo dough, walnuts, clarified butter, a fragrant honey syrup, and spiced with cardamom and cloves. It is distinct from other regional versions of baklava in its technique: Armenian pakhlava uses ghee rather than plain melted butter, a walnut filling kept in chunky pieces rather than ground, and a honey-forward syrup poured hot over the finished pastry. The result is a pastry that is crisp at the edges, richly soaked at the center, and deeply fragrant. It keeps at room temperature for weeks, which is why it has always been the natural choice for holidays and celebrations.
Table of Contents
Chronicles of Tertanoush or Pakhlava
This intricate sweet nut-filled pastry, referred to as tertanoush in Armenian tradition and recognized internationally as baklava or pakhlava, started its journey long ago.
Pakhlava is crafted by Armenians, Persians, Greeks, and Arabs at the crossroads where Europe, Asia, and Africa converge. As a culinary treasure, it’s influenced by and complements various traditions, reflecting a cultural signature in each layer. Each nation’s pakhlava holds its unique flavor, aroma, and history where one can trace the culinary heritage that has evolved over centuries.
HrachiaAcharian, a prominent linguist, performed etymological research leading him to a 10th-century Ancient Armenian manuscript where the term “tsagh” was mentioned – often synonymous with honeybread. He uncovered other references such as tsal-tsol (fold by fold) or tert-tert (sheet by sheet), indicative of dough layered with nuts, honey, and ghee across historical Armenian regions and dialects. This exploration pointed to the pastry’s origins as a honey-soaked delicacy.
The honey-infused pakhlava was a celebrated delicacy in Sebastia, Gamerek, Mush, Van, Tigranakert, Kesaria, Kars, Bayazet, and Erzrum, and was especially cherished during holidays and special events. Displaced, uprooted, and scattered across the world, Armenians carry on the tradition of making, introducing, and sharing their beloved tertanoush – a sweet connection to home and heritage.
From humble origins as a honey-soaked pastry to tertanoush, this dessert has become a cherished confection, globally known as baklava.
What Makes This Recipe Special?
Essential Grocery List and Ingredient Notes

Substitutions & Customizations
Time Required:
Bake in a 350°F(180°C) preheated oven.
Special Tools to Use:
Recipe Steps at a Glance
This pakhlava recipe can be broken down into the following steps:
Step-by-step: How to Make Pakhlava
Step 1: Preparing walnut filling
In a food processor, pulse the nuts to achieve fine to medium-sized pieces, avoiding powder. Be mindful not to let the food processor run continuously. Add the sugar and spices, then pulse 2-3 times until fully combined. Transfer the mixture to a bowl, ready for use.
Tip:
You can prepare this filling up to 3 days in advance. Store in an airtight container at room temperature.
Step 2: Clarifying butter (making ghee)
Melt the butter in a heavy-bottomed pan over medium heat, allowing it to gently simmer. Be attentive to prevent spillage. As the butter melts, it will foam up and rise. Sprinkle a tablespoon of flour; you’ll observe the foam clumping and settling. Reduce the heat, allowing it to cool a bit. Once cooled, you’ll see clarified butter on top and white milk solids at the bottom. Carefully pour through a fine mesh sieve into a glass jar, ensuring you don’t disturb the residue that’s on the bottom. Check out the full recipe for ghee.
Note:
For detailed instructions, check out my full recipe for Golden Ghee (Zoulal Halats Yough). Ghee can be made up to 2 weeks in advance and stored at room temperature.
Step 3: Making syrup
Combine sugar with water and bring to a boil. Drop in the piece of lemon peel, and cloves if using. Cook for 10 minutes until syrup reaches 210 degrees F. Add the honey and lemon juice. Remove the lemon peel and cloves and set it aside to completely cool.
Can I make the syrup ahead?
Yes! The syrup can be made up to 3 days in advance. Store covered at room temperature. If it thickens too much, gently warm it and let it cool again before using.
Step 4: Assembling the sheets
Open the phyllo dough package and carefully unfold the sheets onto a clean, flat surface. Inspect all sheets, setting aside any that are broken, cracked, or torn. You can use these in the middle of layers. Reserve the most beautiful, intact sheets for the top layer.
Bottom layers

Pic 1: Layering phyllo sheets Pic 2: Pleating the phyllo sheets Pic 3: Overlapping the phyllo sheet


Begin layering the phyllo sheets immediately on the baking sheet. Using a pastry brush, apply a thin layer of clarified butter and place the second sheet on top.
Continue layering, applying butter between each sheet (pic 1). After the 4th layer, pleat 2-3 ‘not-so-perfect’ sheets into an accordion (pic 2) and lay them down. Brush with clarified butter and place the next sheet on top.
Adding the walnut filling
When halfway through the sheets (from your box), let the next two sheets overlap from the middle, overhanging on either side (pic 3).

Pic 4: Scattering the walnut filling Pic 5: Folding sheet back. Pic 6: Folding sheet back.


Scatter the walnut mixture in an even single layer (pic 4). Fold the overhanging flaps over, creating an envelope (pic 5 & 6).
Top layers
Continue layering the remaining phyllo sheets one at a time, brushing each with clarified butter. Remember to use your best, most intact sheets for these top layers – they’ll be visible in the final presentation.
After placing the final sheet, brush the top generously with remaining clarified butter, making sure to coat the entire surface and edges.
Step 5: Scoring the pakhlava
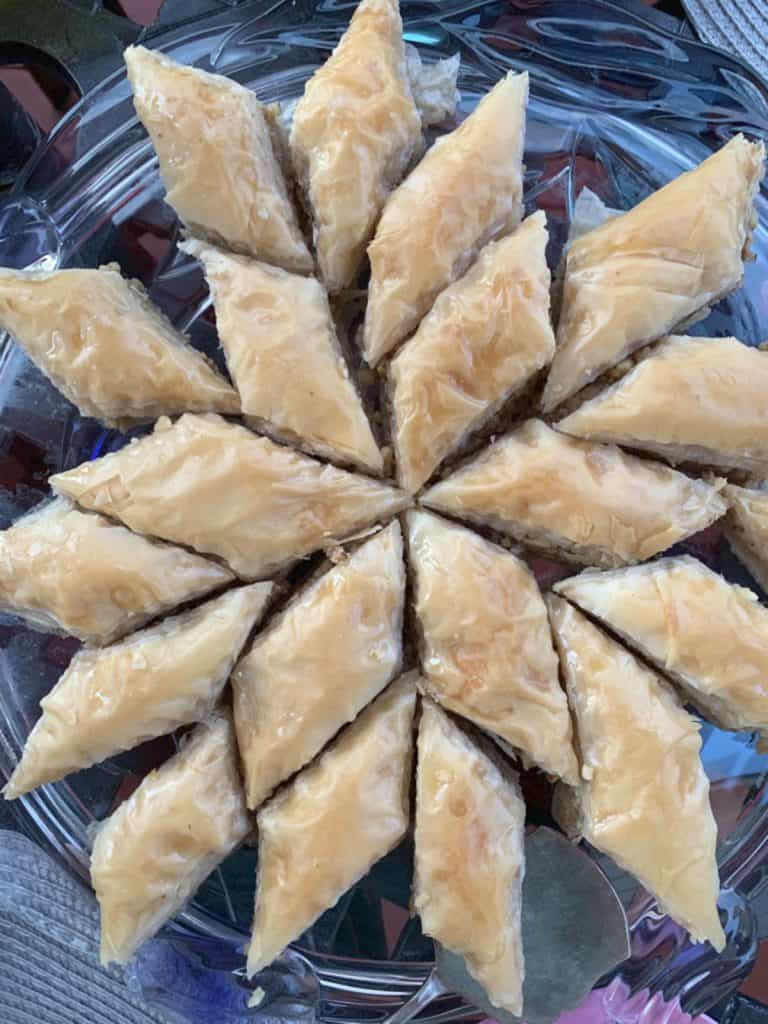
When it comes to scoring the pakhlava, there are different schools of thought – cutting it into squares, triangles, or the iconic diamond shape, which happens to be my preferred choice.
To create a diamond pattern, the first cuts should be parallel to the sides of the sheet pan, while the cross cuts should be diagonal. The incisions should be about ⅔ deep, enough to cut through the walnut layer but not reach the bottom of the sheet.
Use a sharp knife with a vertical up-and-down cutting motion, as opposed to cut-and-drag technique.
Pic 7: Scoring pakhlava vertically Pic 8: Scoring pakhlava diagonally. Pic 8: Scoring pakhlava diagonally.


Score the perimeter
First, score the edges all the way around. This will yield crisp looking edges for the final baked pakhlava.
Create vertical sections
Start by finding the center point of your sheet and make an incision all the way across. Then, divide each half into 3 and score those as well, resulting in 6 sections.
Create diagonal cuts for diamonds
Next, score one corner to make it into a triangle. Follow it up with another incision parallel to that one. This process creates a beautiful diamond pattern on your pakhlava.
Gently hold the phyllo sheet with your other hand to ensure they don’t lift.

Final butter application
After all the cuts are done, generously brush the seams with clarified butter (pic 10). Using the brush, “iron out” any layers that might have been shifted.
Your tray of pakhlava is ready for baking.
Step 6: Baking pakhlava and finishing
Preheat the oven to 350°F (180°C).
First stage: Bake at 350°F (180°C) for 20 minutes. The pastry should visibly rise with a distinct diamond-shaped pattern beginning to form.
Second stage: Reduce heat to 300°F (150°C) and continue baking for 20 minutes. This lower temperature allows the interior layers to cook through without over-browning the top.
Final stage: Rotate the tray 180 degrees (for even browning), increase the heat back to 350°F (180°C), and bake for a final 10 minutes. The top should be deep golden brown.
Remove the baked pakhlava from the oven (pic 11). With the sharp knife and go over the pre-cut groves and cut all the way through.

Pic 11: Baked pakhlava Pic 12: Spooning syrup over Pic 13: Spooning syrup over the cuts


Pour the cool down syrup over the hot pastry, ensue that all the pieces get a generous application of the syrup (pic 12 & 13).
Loosely cover with foil and let it all soak for at least 6-hours or overnight.
Best Way to Serve
Tips and Wisdom from Cafe Osharak
Frequently Asked Questions
Does paklava store in the fridge?
The uniqueness of paklava is that it can stay at room temperate for weeks. The use of clarified butter and honey syrup, makes the pastry naturally preserved so it can stay out of the fridge.
Can you freeze paklava?
It freezes well and doesn’t lose its appeal or taste. Defrost in refrigerator or at room temperature. To spruce it up, make a small amount of simple syrup and pour the hot syrup over it.
Does paklava have honey?
Authentic paklava recipes always call for honey. If the honey is not an option, use all sugar, or agave nectar can be used (in place of honey).
More Armenian Sweet Traditions
Layered pastries with nutty, syrupy richness have a special place in many culinary traditions. Pakhlava belongs to a longer story of Armenian confectionery – sweets that carry memory, season, and occasion in every layer. These are its companions on the same festive table.
More Recipes to Try from Cafe Osharak
If you enjoy working with phyllo dough, you will definitely love working with kadaif – delicate, angel-hair-like strands of pastry dough. One of the most delightful treats you can make with it is Dubai chocolate bar.

Armenian Pakhlava – Walnut Pastry with Honey Syrup (Tertanoush)

Ingredients
- 1 package phyllo dough 24-25 sheets
- 4 cups walnuts
- ¼ cup sugar
- 1/4 teaspoon cardamom seeds ground
- 2 cups ghee clarified butter
- 1 1/2 cups sugar
- 1 1/2 cups water
- 1 cup honey
- 1-2 tablespoon lemon juice
- Lemon peel
- 1-2 cloves
Instructions
Prepare the walnut filling
- In a food processor, chop the nuts with a few pulses. You want to have fine to medium pieces but not powder. Add the sugar and spices and give 2-3 pulses until fully combined. Transfer to a bowl until ready to use.4 cups walnuts, ¼ cup sugar, 1/4 teaspoon cardamom
Clarify the butter
- Melt the butter in a heavy-bottomed pan over medium heat, allowing it to gently simmer. Be attentive to prevent spillage. As the butter melts, it will foam and rise. Sprinkle a tablespoon of flour; you'll observe the foam clumping and settling.2 cups ghee
- Reduce the heat, allowing it to cool a bit. Once cooled, you'll see clarified butter on top and white milk solids at the bottom.
- Carefully pour through a fine mesh sieve into a glass jar, ensuring you don't disturb the residue that's on the bottom.
Start layering
- Open the phyllo dough package and lay it flat on a surface. Inspect the sheets, setting aside any broken ones. Reserve the best sheets for the top layer.1 package phyllo dough
- Begin layering the phyllo sheets immediately on the baking sheet. Using a pastry brush, apply a thin layer of clarified butter and place the second sheet on top.
- Continue layering, applying butter between each sheet. Brush with clarified butter and place the next sheet on top. When halfway through the sheets, let the next two sheets overlap from the middle, overhanging on either side.
- Scatter the walnut mixture in an even single layer. Fold the overhanging flaps over, creating an envelope, and continue the process of applying clarified butter and layering the sheets.
Scoring the paklava
- When it comes to scoring the paklava, there are different schools of thought: cutting it into squares, triangles, or the iconic diamond shape, which happens to be my preferred choice.
- To create a diamond pattern, the first cuts should be parallel to the sides of the sheet pan, while the cross cuts should be diagonal. The incisions should be about ⅔ deep, enough to cut through the walnut layer but not reach the bottom of the sheet.
- Use a sharp knife with a vertical up-and-down cutting motion, as opposed to the cut-and-drag technique.
- First, score the edges all the way around. This will give crisp looking edges to the final baked paklava.
- Start by finding the center point of your sheet and make an incision all the way across. Then, divide each half into 3 and score those as well, resulting in 6 sections.
- Next, score one corner to make it into a triangle. Follow it up with another incision parallel to that one. This process creates a beautiful diamond pattern on your paklava.
- Gently hold the phyllo sheet with your other hand to ensure they don’t lift.
- After all the cuts are done, generously brush the seams with clarified butter. Using the brush, iron out any layers that might have been shifted.
Baking pakhlava
- Preheat the oven to 350°F (180°C).
- Position the baking tray in the middle rack and bake for 20 minutes. The pastry should visibly rise with a distinct diamond-shaped pattern.
- Reduce the heat to 300°F (150°C) and continue baking for an additional 20 minutes.
- Rotate the tray, increase the heat back to 350°F (180°C), and bake for an additional 10 minutes.
- Remove from oven. While hot, use a sharp knife to cut through all pre-scored lines, cutting to the bottom.
Making syrup
- Combine sugar with water and bring it to a boil. Drop the piece of lemon peel, and cloves if using. Cook for 10 minutes until syrup reaches 210 degrees F. Add the honey and lemon juice. Remove the lemon peel and cloves and set it aside.1 1/2 cups sugar, 1 1/2 cups water, 1 cup honey, 1-2 tablespoon lemon juice, Lemon peel, 1-2 cloves
Notes
- Clarified butter is essential: Regular melted butter will create dark spots during baking.
- Temperature matters: Always pour cool syrup over hot pakhlava (or vice versa) for best absorption.
- Thaw phyllo properly: Overnight in the refrigerator, then bring to room temperature before using.
- Don’t rush the resting time: Overnight absorption yields the best texture.
- Storage: Keep at room temperature, covered, for up to 2 weeks. No refrigeration needed.
- Freezing: Freezes well for up to 3 months. Defrost and refresh with warm simple syrup if desired.
- Nut substitutions: Pistachios or almonds work beautifully in place of walnuts.