Esterhazy Cake – Classic European Dessert

This post may contain affiliate links. As an Amazon Associate, I earn from qualifying purchases. See my Affiliate Disclosure .
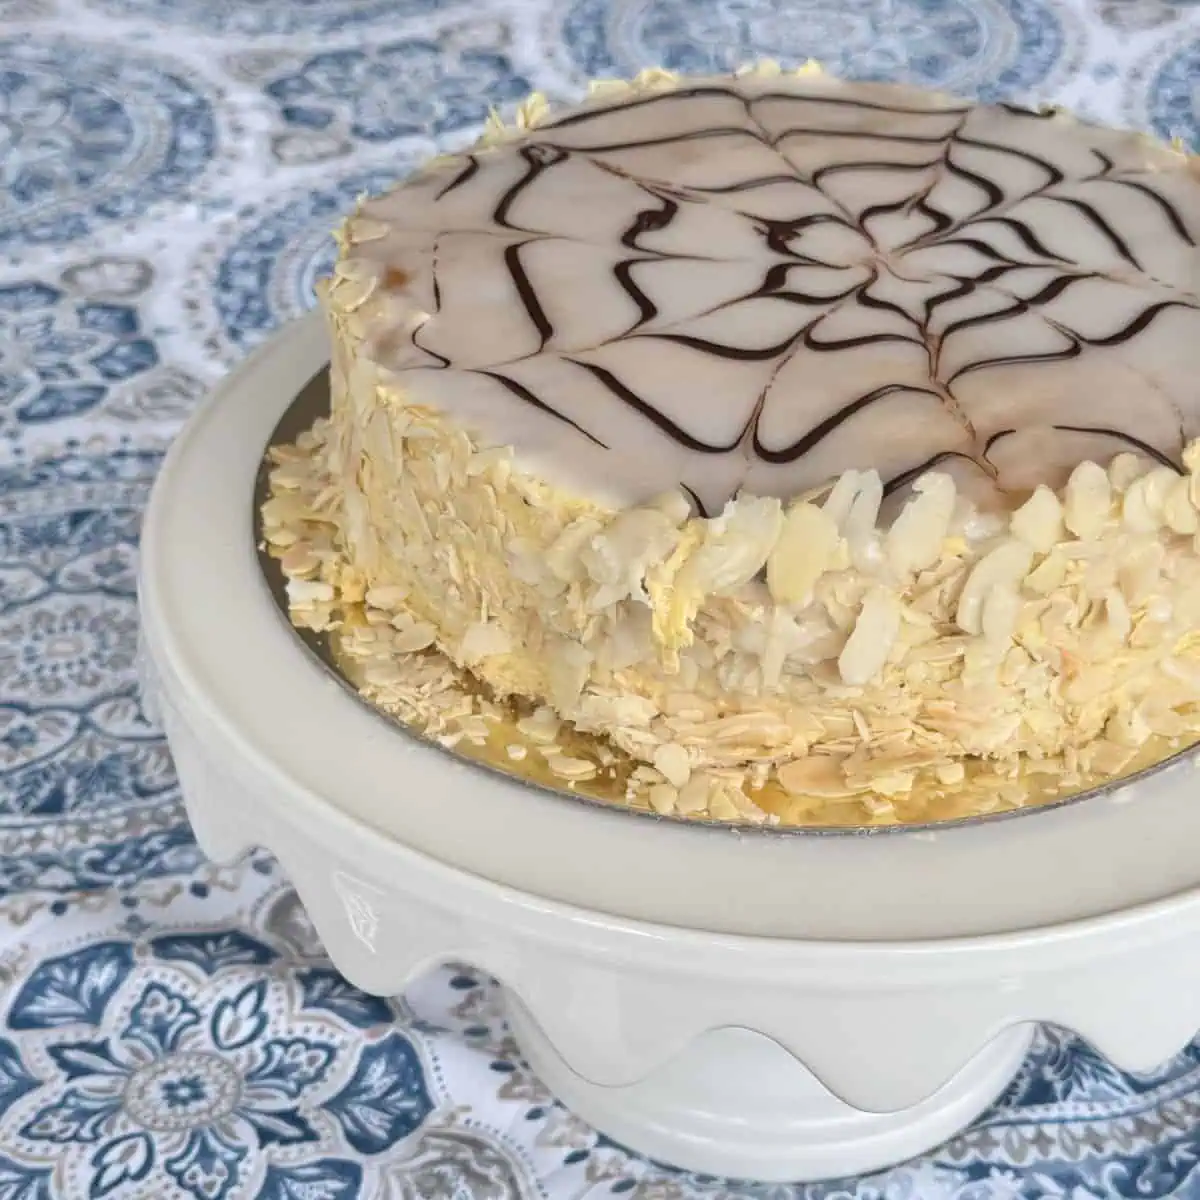
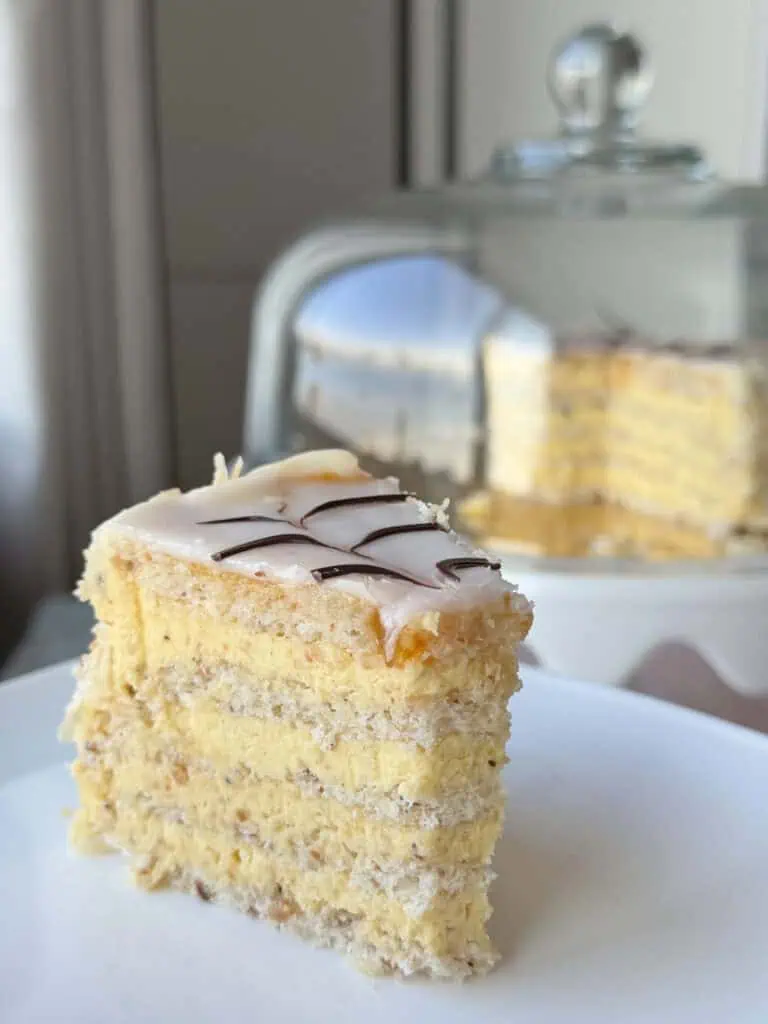
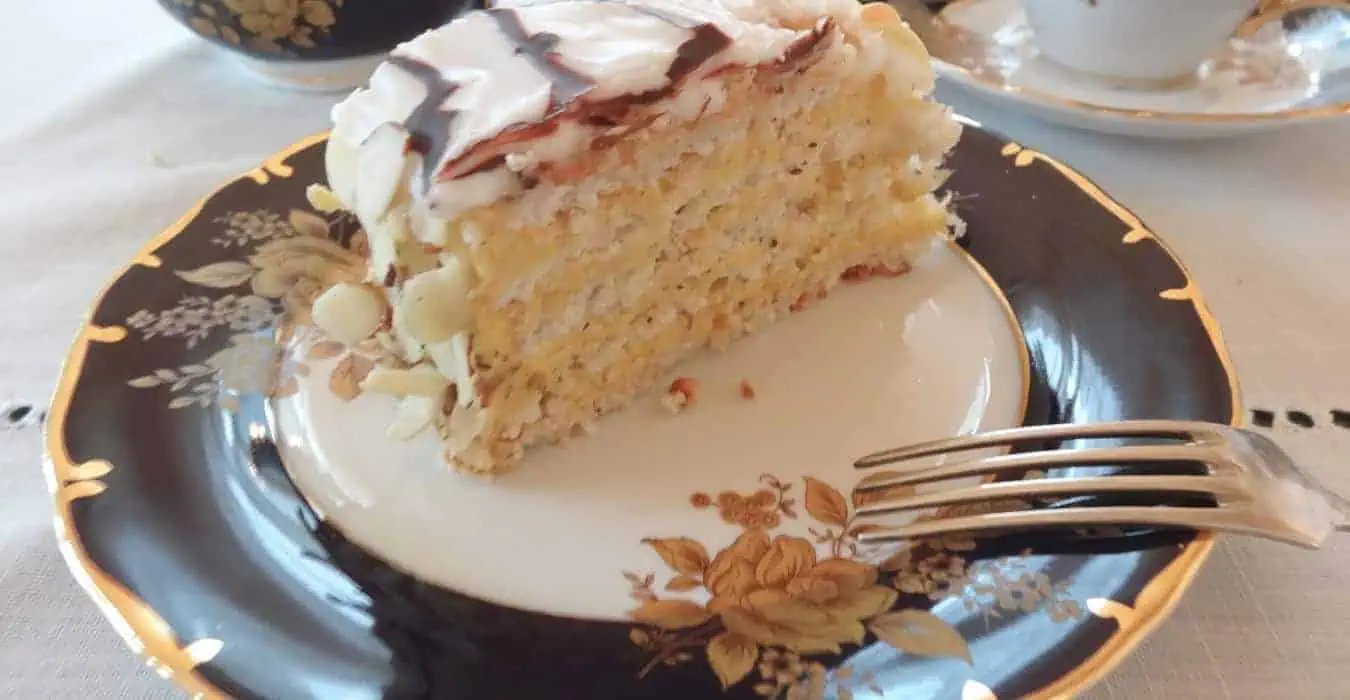
Esterhazy Cake is a classic cake of Hungarian origin that became beloved in Vienna and is now celebrated around the world. The feathered glazed top design and hazelnut flavor are as memorable as its name. The Esterházy cake combines the richness of toasted hazelnuts, delicate layers of dacquoise, and a buttery, nut-infused cream filling, finished with an iconic web design. I will walk you through every detail, from roasting hazelnuts to the final decorative touches, ensuring your torte is as stunning as it is delicious, and most of all it can be done in your kitchen.
If you enjoy layered cakes, you’ll also love classics like Dobos Torte and Smetannik, both rich in European baking tradition as well as honey infused Bird’s Milk Honey cake.
Table of Contents
Chronicles of My Global Baking Adventure
I had been silently following the Daring Bakers for some time. This group was a global network of bloggers, ranging from highly skilled bakers to aspiring ones. Each month, a new challenge was set, giving home bakers the opportunity to practice and experiment with world-class pastries. The reward? Our very own baking chefs-d’œuvre.
The Daring Bakers club no longer exists, but I am grateful for how it pushed my limits and inspired me as a food blogger.
During a snowy January in 2015, our Daring Bakers host Jelena from A Kingdom for a Cake, invited us to start the year with a dreamy celebration cake. She challenged us to make the Esterhazy cake a.k.a. the Hungarian dream.
This elegant torte, though Hungarian in origin, gained fame in Viennese coffeehouses and has since become a celebrated dessert across Europe and beyond.
Since this challenge coincided with my birthday, I decided to treat my family to this exotic and daring cake. To make this challenge even more exciting, my mom (in Armenia) and I (in the US) decided to make this cake together, each in our own kitchens. We both had very interesting experiences and came with very different cakes.

The best parts of this recipe:
Essential Grocery List and Ingredient Notes
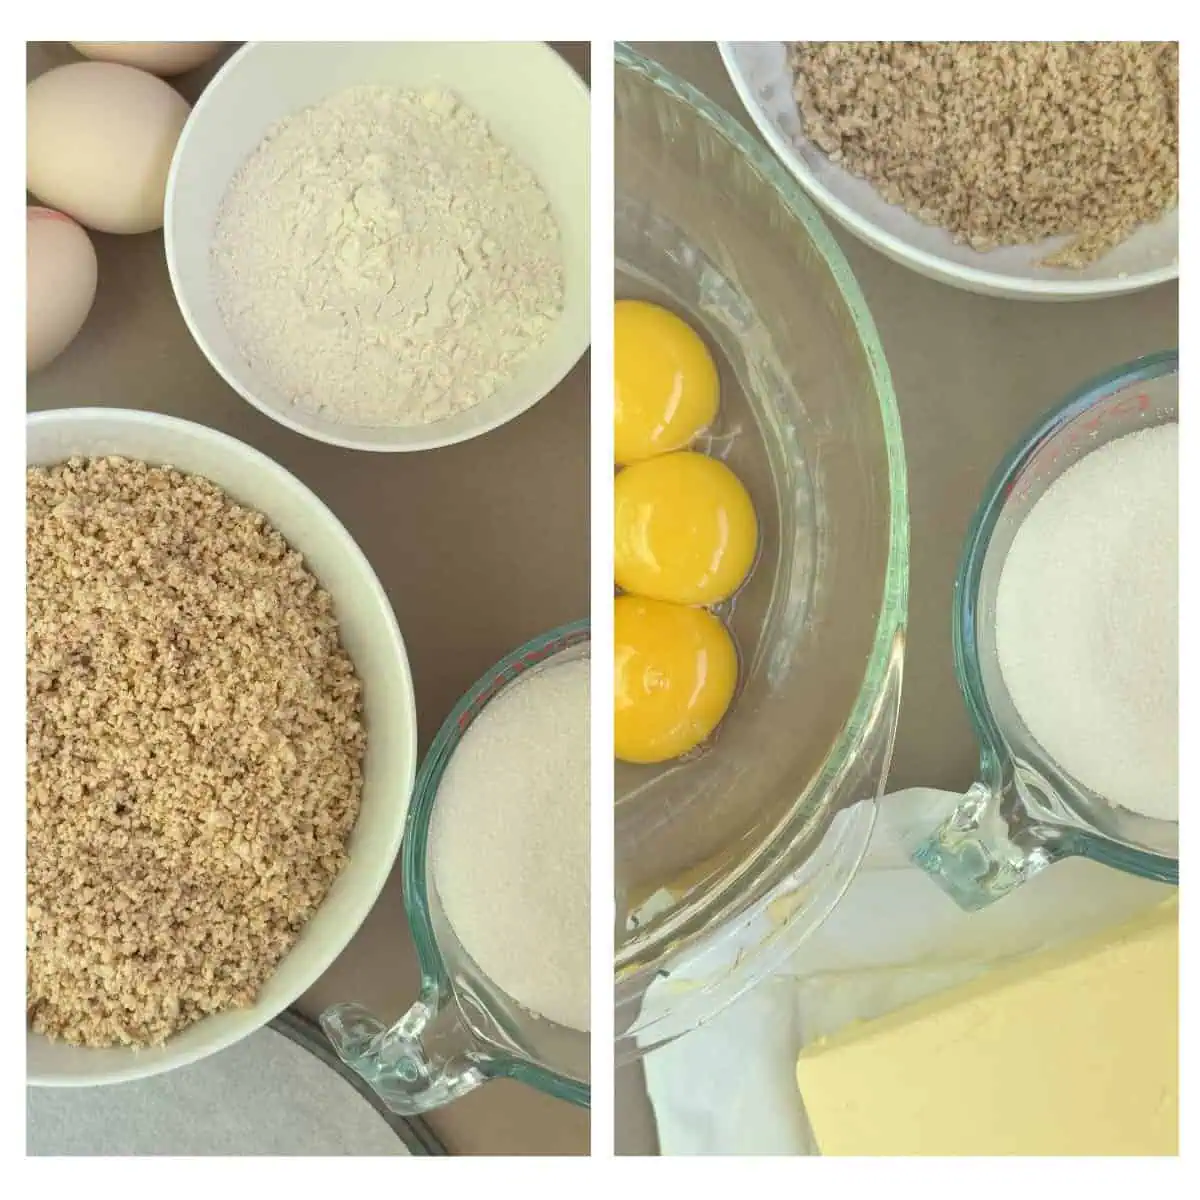
Time Required:
Bake in a 350°F (180°C) preheated oven.
Special Tools to Use:
Recipe Steps at a Glance
The Esterhazy cake recipe can be broken down into the following steps. The first three steps can be done ahead of time, a few days in advance.
Step-by-step: How to Make Esterházy Torte
Step 1: Roasting Hazelnuts
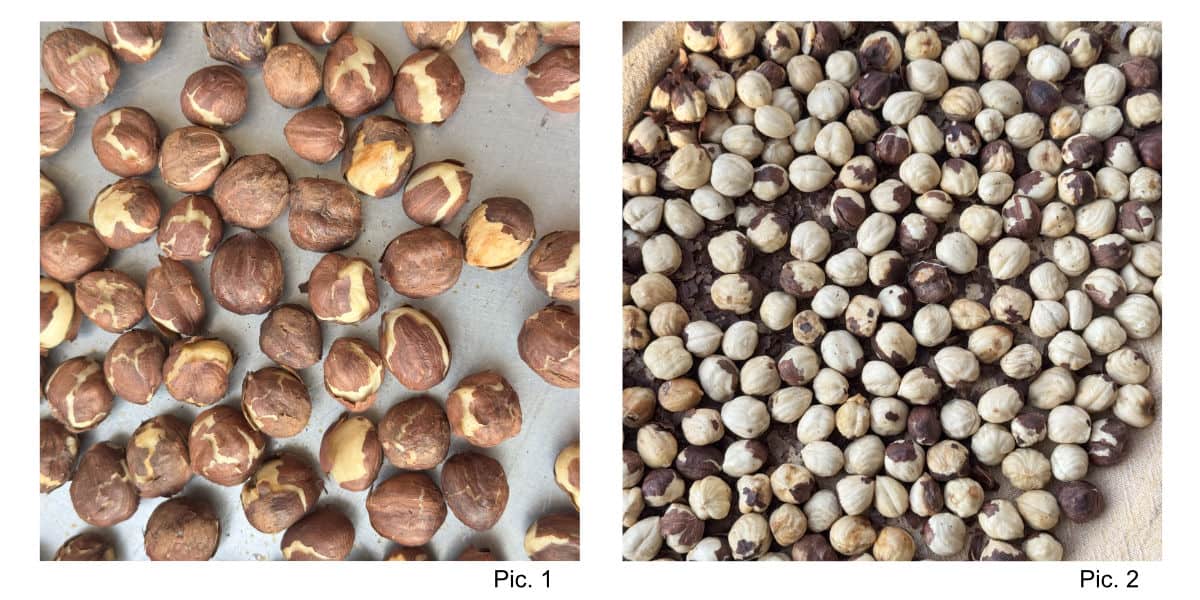
Preheat the oven to 350°F (175°C). Spread the hazelnuts on a baking sheet and roast for a few minutes, just until their skins begin to crackle (Pic. 1).
Transfer the warm nuts to a paper bag or a kitchen towel and rub them together to remove as much of the skin as possible. The skin will come off easily (Pic. 2). Some of the stubborn skin can be left on.
Grind the nuts in a food processor, pulsing in short bursts, until finely ground. Avoid over-processing to prevent clumping.
Step 2: Making the Dacquoise
Tip: Prepare five 8-inch parchment paper circles by tracing and cutting them. Place these on baking sheets for the dacquoise. I also like to use the bottoms of springform pans and line them with round 8-inch pre-cut liners.
Preheat the oven to 325°F (160°C).
In a food processor, pulse the faintly roasted hazelnuts with powdered sugar until finely mixed.
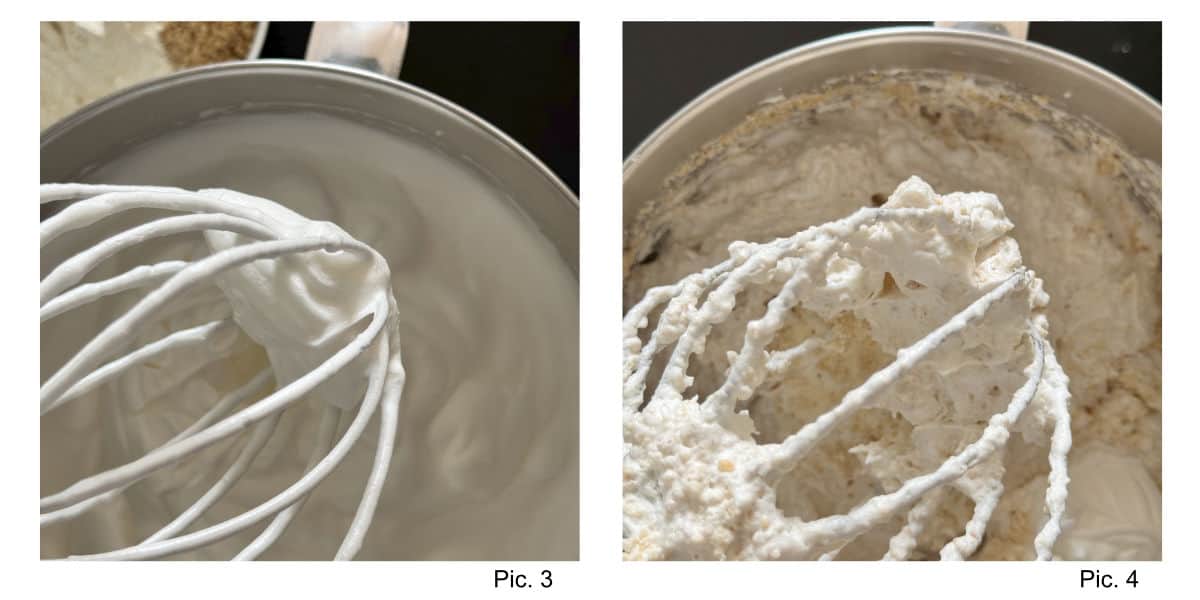
Using a stand mixer with a whisk attachment, beat 12 egg whites on medium-high speed until soft peaks form (Pic. 3). Gradually add sugar while mixing, and continue until stiff peaks form.
Gently fold in the flour and ground hazelnut mixture until just combined (Pic. 4).
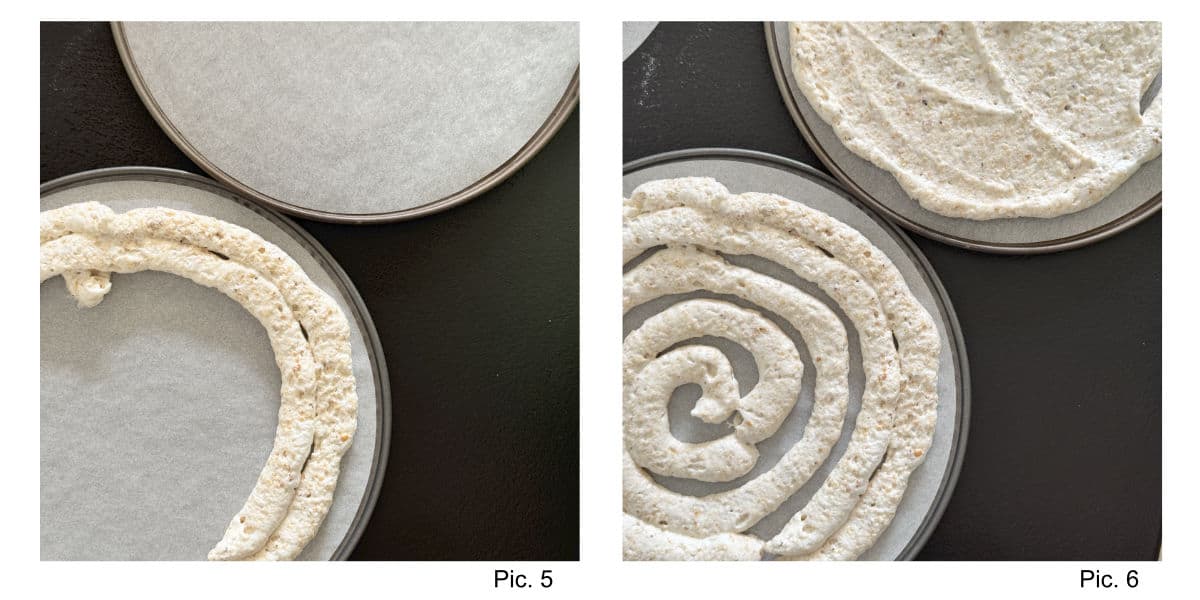
Fill a pastry bag with the mixture and pipe onto the prepared parchment circles (Pic. 5). Smooth the tops with an offset spatula into round disks (Pic. 6).
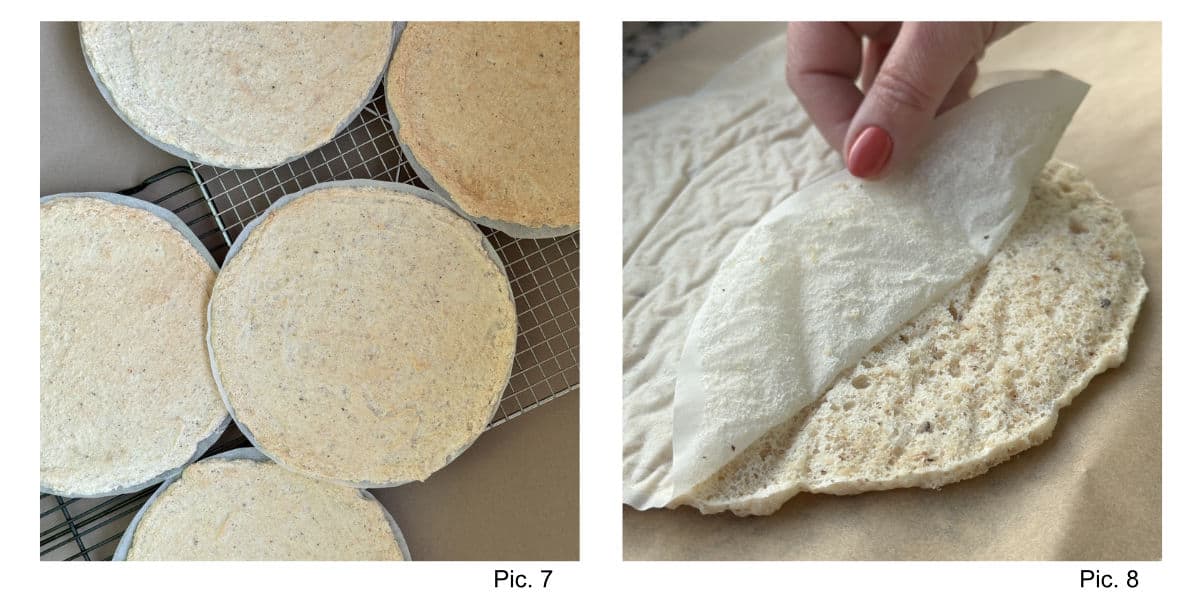
Bake for 15 minutes, or until firm and lightly golden. Let the layers cool on a wire rack (Pic. 7). Once cooled, carefully peel off the parchment paper (Pic. 8) but keep it with the layers. This will allow you to stack and store them easily until ready to use.
Step 3: Making the Buttercream
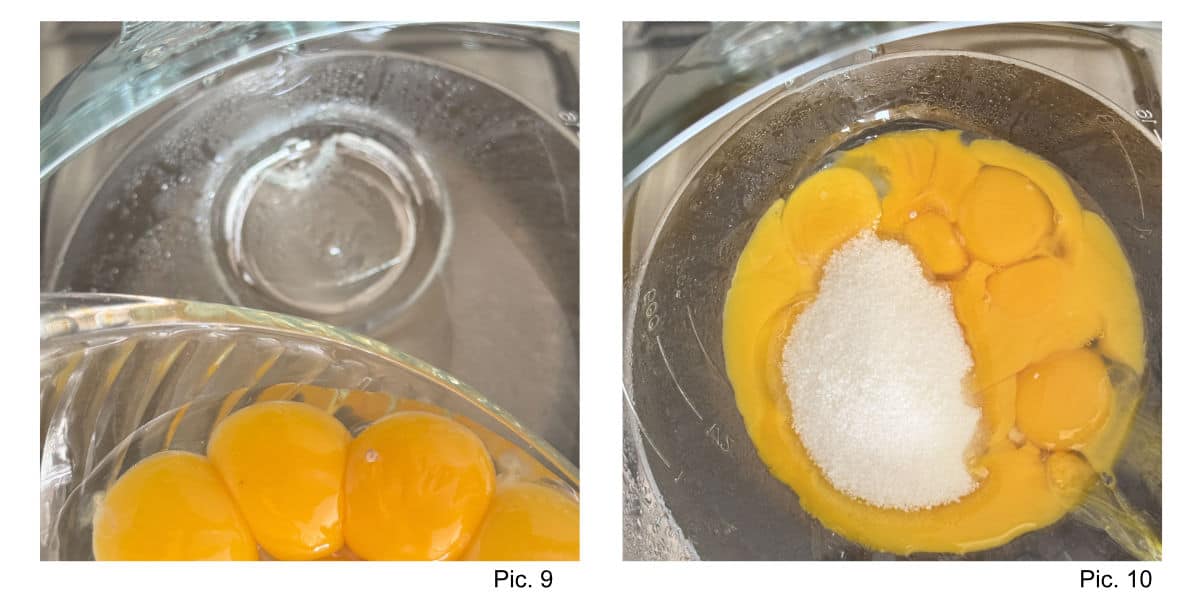
Prepare a double boiler. In a standing mixer bowl, whisk together 12 egg yolks and 250g sugar (Pic.9 and Pic. 10). Place over simmering water and stir continuously for 15 minutes until thickened and the temperature reaches to 150°F (70°C).
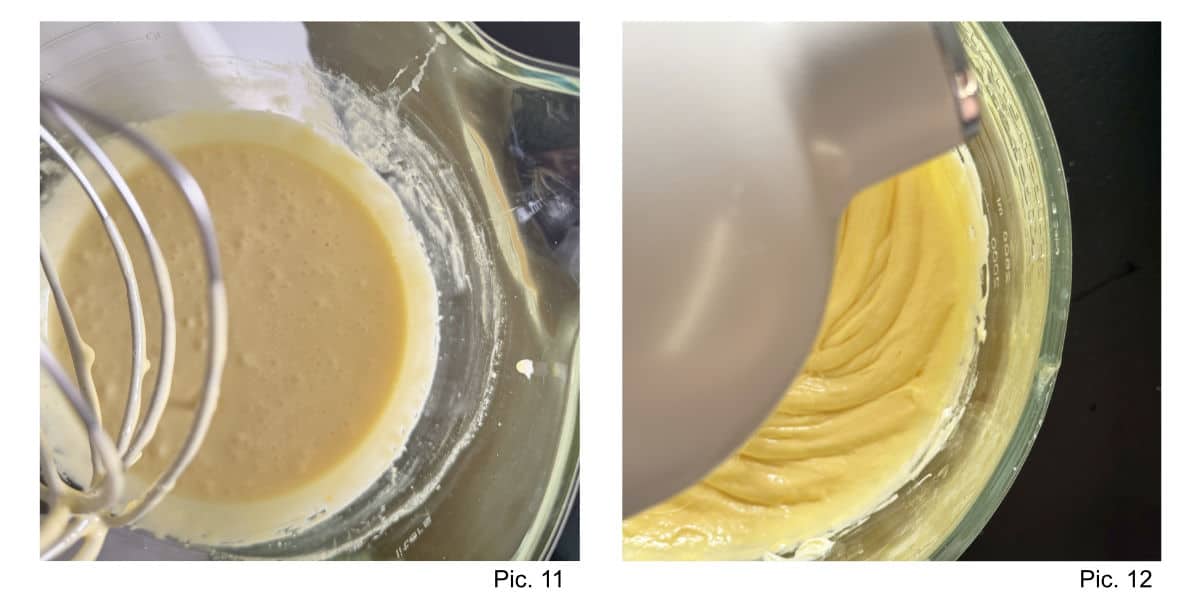
Let the mixture cool a bit then place the bowl in the standing mixer and whip with the balloon whisk (Pic. 11 and Pic. 12).
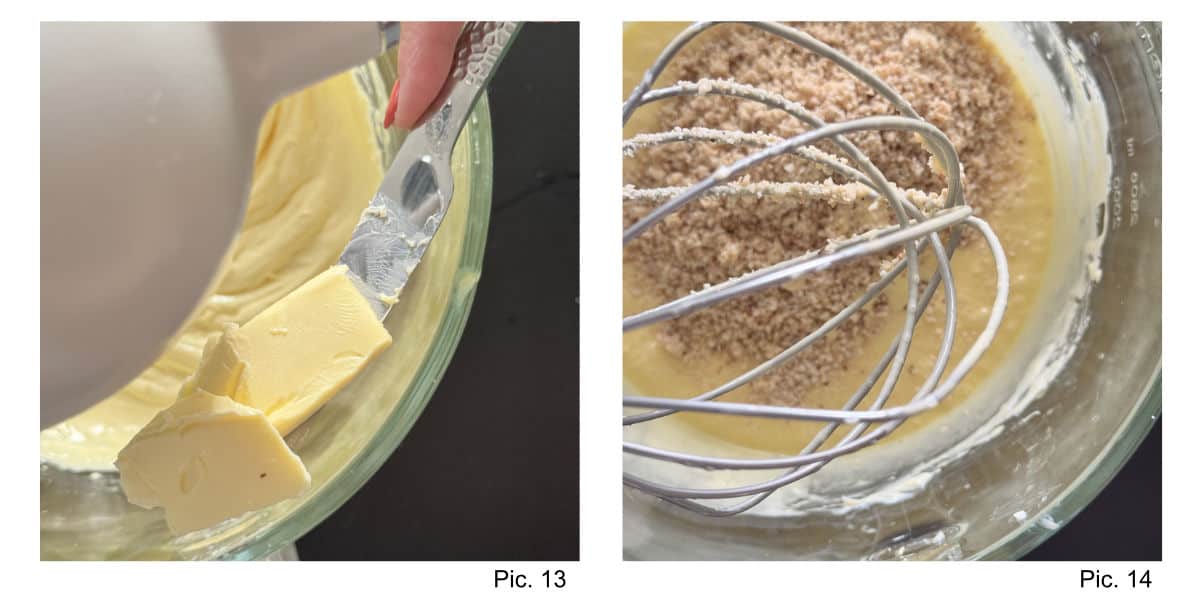
Start adding the butter, a piece at a time (Pic. 13) and beat until fully incorporated. Fold in the ground hazelnuts (Pic. 14).
Step 4: Assembling the Torte
Strain the apricot jam and warm up with a teaspoon of water on the stove or in the microwave. Stir until smooth.
Reserve 1/4 cup of the buttercream for the sides.
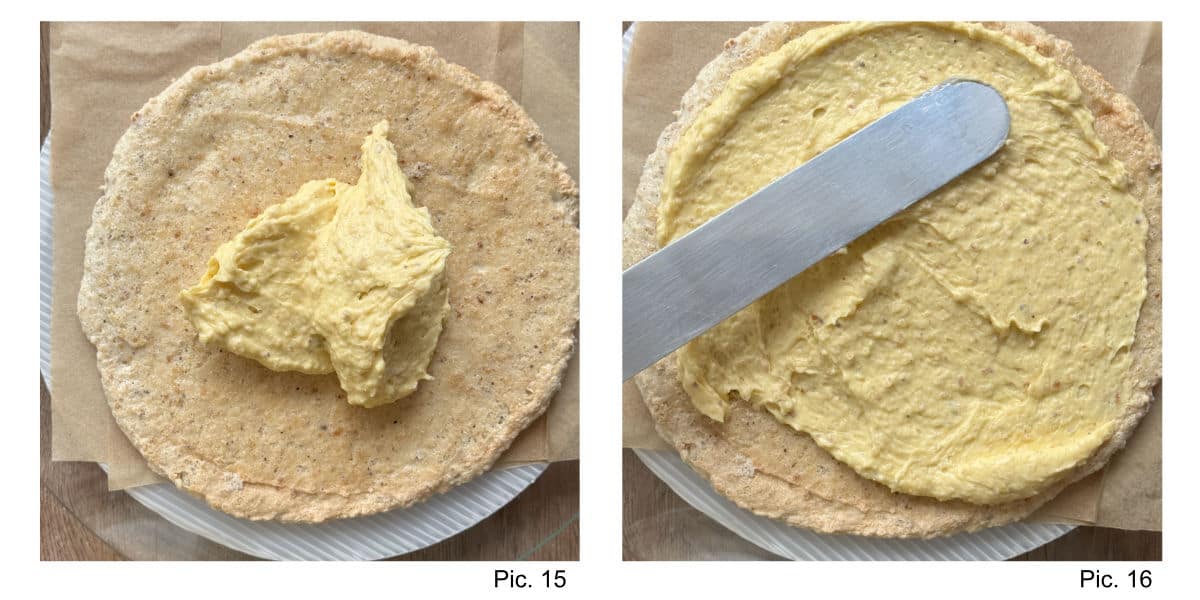
Place the first dacquoise disk on a trivet plate and spread one-fourth of the filling over it (Pic. 15 and Pic. 16). Repeat for the next three layers.
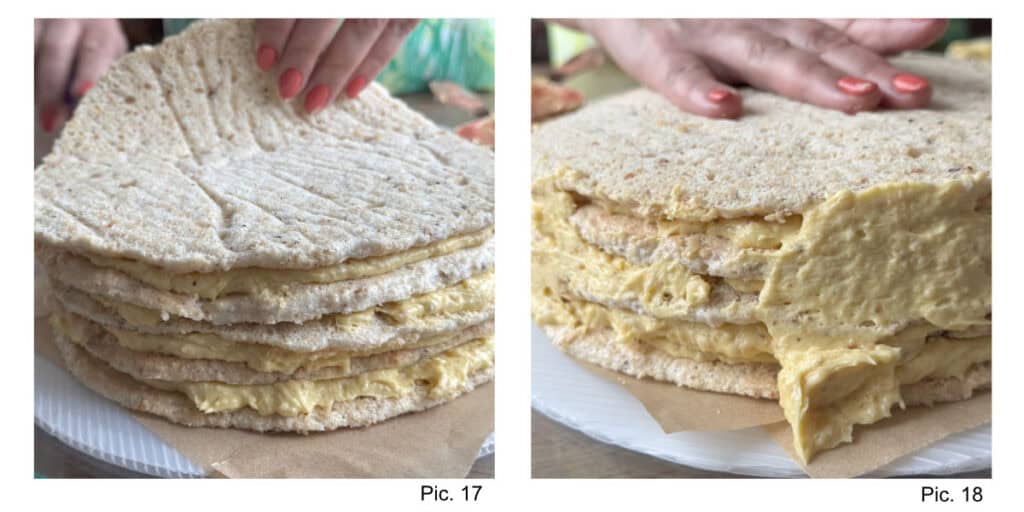
Place the final disk bottom-side up for a smooth surface (Pic. 17). Press gently to level the cake. Crumb-coat the sides with thin layer with some of the reserved buttercream over the sides (Pic. 18) but leave the top layer un-coated for now. Chill the cake for 1 hour to firm up.
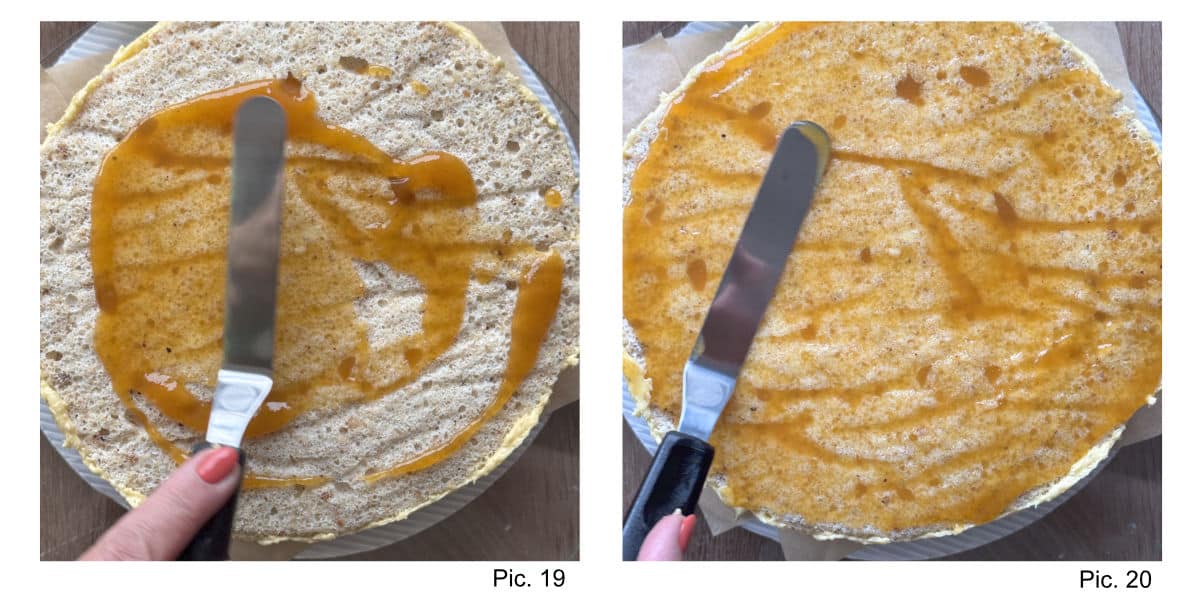
Spread the apricot glaze evenly over the top layer and chill for an additional 10–30 minutes (Pic. 19 and Pic. 20).
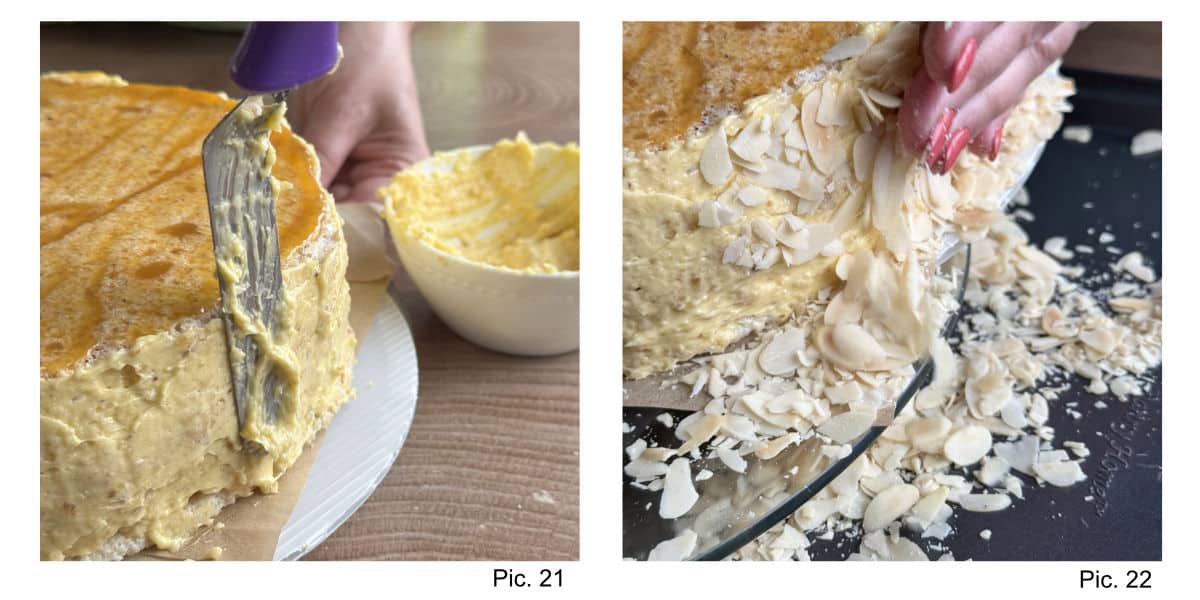
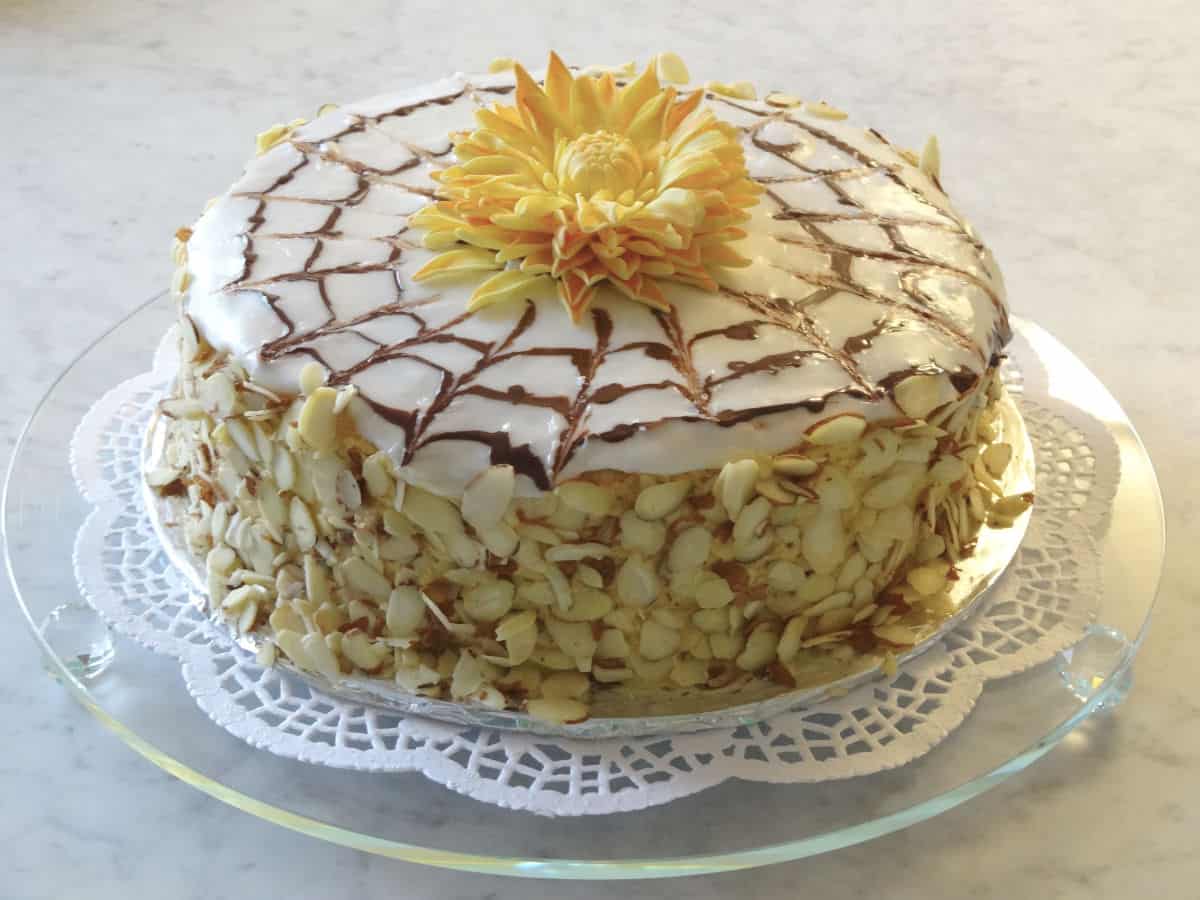
Use the remaining buttercream for the final coat (Pic. 21), and cover the sides with almond slices (Pic. 22).
Step 5: Faux Fondant Icing and Chocolate Decoration
Tip: This part requires working quickly.
Melt chocolate with a teaspoon of oil and fill the piping bag.
Prepare the icing by mixing powdered sugar, lemon juice, and oil. Add hot water drop by drop, stirring until the icing is shiny and smooth but not runny.

Spread the icing quickly over the apricot-glazed top layer using a hot, wet knife (Pic. 23 and Pic. 24).
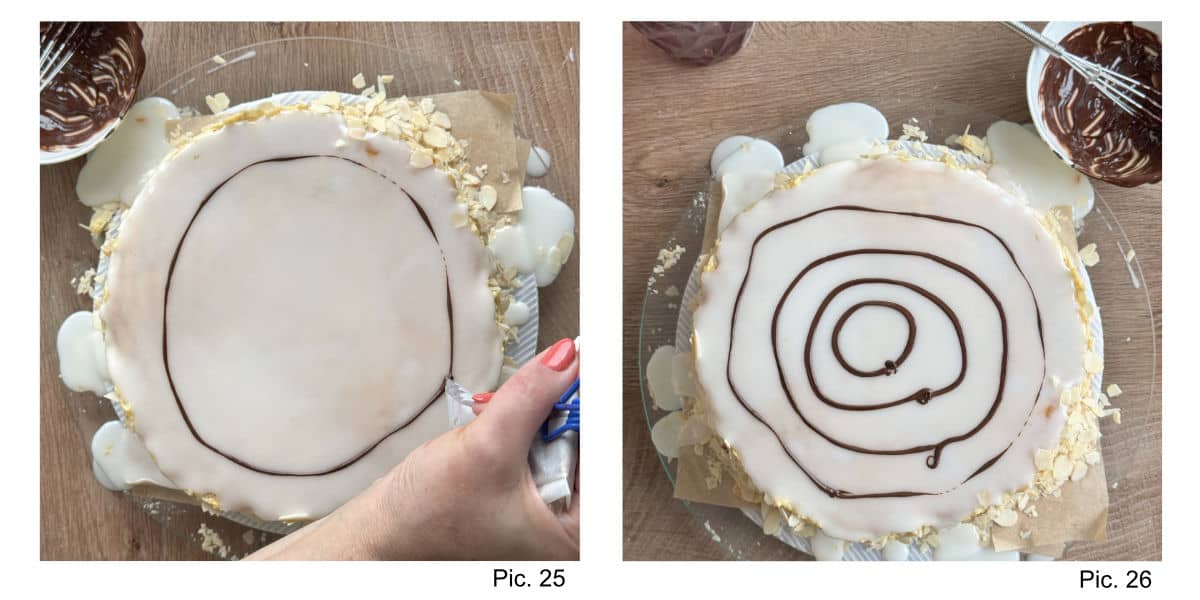
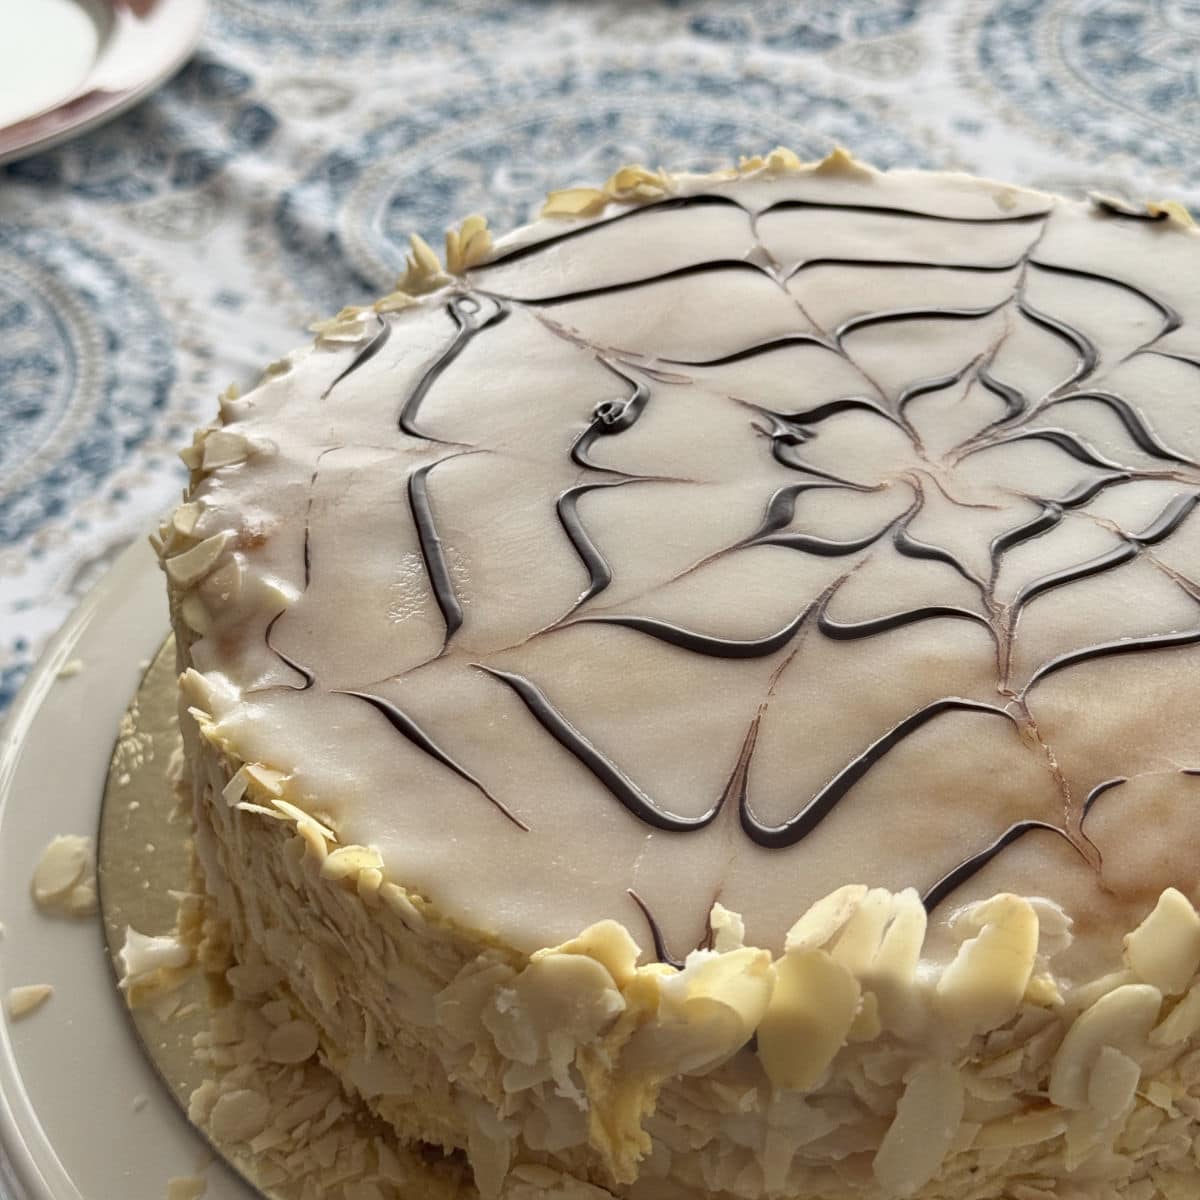
Cut the tip of the chocolate bag and pipe concentric circles onto the icing.
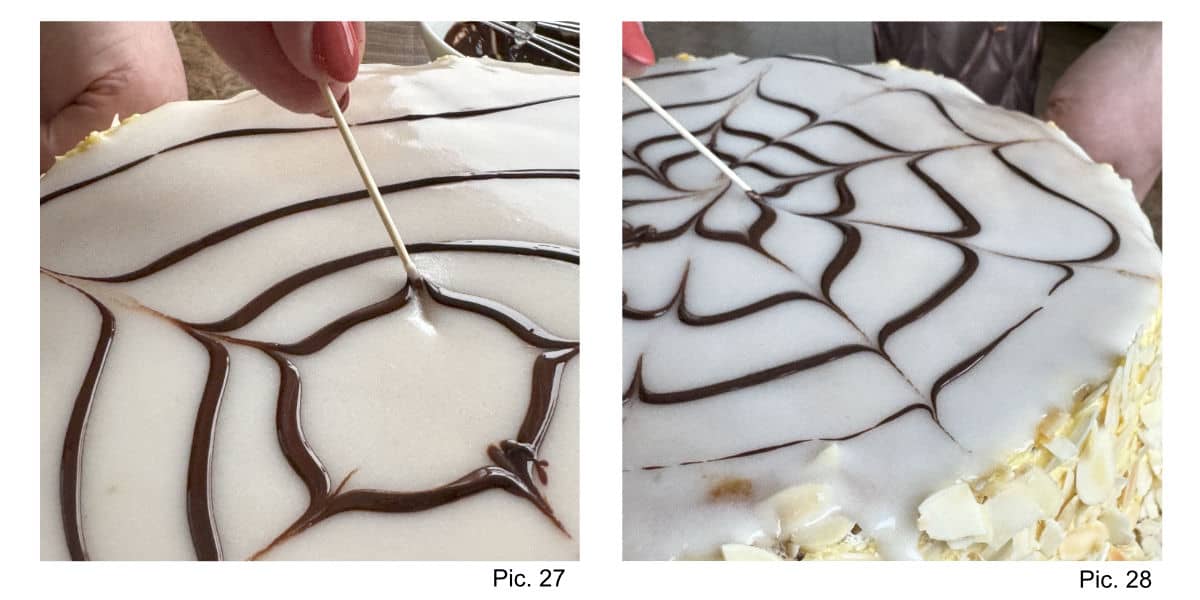
Use a skewer or toothpick to create the classic web design by dragging lines outward from the center and then alternating inward (Pic. 27 and Pic. 28).
Step 6: Finishing Touches
Press sliced almonds around the edges for a polished finish.
Serving Suggestions and Presentation Ideas
To elevate my cake even further, I decided to crown it with a sugar paste flower.
I chose dahlia as my centerpiece. The flower’s cascading petals were flowing nicely with the cobweb design of the cake.

Dahlias come in various shapes and colors and I wanted the sunburst apricot color to play nicely with the cake tones.
Tips and Wisdom from Cafe Osharak
More from the Viennese Coffeehouse Tradition
If you made it to the end of the Esterházy Torte, you already know you are capable of more than you thought. These are the cakes that belong alongside it – same tradition, same patience required, same reward.


If you give this recipe a try, I’d be thrilled to hear from you! Leave a 🌟 star rating and feel free to reach out with any questions or suggestions. I’m here to help.
Esterházy Torte

Ingredients
Dacquoise
- 250 grams hazelnut toasted ground
- 12 each egg whites
- 250 grams sugar
- 80 grams flour
Hazelnut butter cream
- 12 each egg yolks
- 200 grams sugar
- 300 gram butter
- 150 grams hazelnut toasted ground
Faux fondant icing (Glaze)
- 250 grams powdered sugar
- 2-3 tablespoon lemon juice
- 1 teaspoon almond oil or any neutral oil
Apricot Glaze
- 50 grams apricot jam I used lemon preserve
Chocolate
- 50 grams bittersweet chocolate
- 1 teaspoon almond oil or any neutral oil
- 100 gram sliced almonds
Instructions
Preparation
- Preheat the oven to 350 degrees and bake all the hazelnuts for a few minutes until their skin starts crackling. Put the hazelnuts in a paper bag and rub them against each other to loosen the frail skin. Peal as much as possible.
- In a food processor pulse the nuts for a few seconds at a time until nuts are finely ground.
- Prepare parchment paper by drawing five 8” circles and placing them on a baking sheet.
Dacquoise
- Preheat the oven to 325°F.
- Chop the faintly roasted and cooled hazelnuts with powdered sugar in a food processor.
- In a stand mixer fitted with the whisk attachment, beat 12 egg whites on medium-high speed for 2-3 minutes until soft peaks, gradually add the sugar and continue to beat until stiff peaks form.12 each egg whites, 250 grams sugar
- Gently fold in the flour and ground hazelnuts.80 grams flour, 250 grams hazelnut
- Fill the pastry bag with meringue mixture and pipe it on the prepared parchment papers, smooth with an offset spatula if needed. Bake the rounds for 15 minutes.
Buttercream
- Prepare a double boiler. In a heatproof glass bowl whisk 12 egg yolks and 250g sugar. Put the glass bowl over the simmering water and continue stirring for about 15 minutes.12 each egg yolks, 200 grams sugar
- While the mixture is cooling, cream the butter then add the custard in several batches. Fold in the 150 g grounded hazelnuts.150 grams hazelnut, 300 gram butter
Apricot Glaze
- Heat the apricot jam with 1 teaspoon of water either on the stove or in the microwave.50 grams apricot jam
Assembling the torte
- Reserve 1/4 cup of the buttercream for the sides.
- Place the first disk on a serving plate and spread with one-fourth of the filling, place the second disk and add the filling.
- Place the last layer bottom side up. Firmly press on to make it leveled. Leave it without cream. We will spread the jam on the last layer after the cake is chilled.
- Place the cake into the fridge for one hour to firm it up, so it holds the layers.
- Crumb coat the sides and chill for another 10 minutes. Save some buttercream for the final coating.
- Evenly spread the apricot jam on the last layer and chill the torte for an additional 10-30 minutes.
Chocolate
- Melt the chocolate with a teaspoon of oil, place in a piping bag. Set the bag aside until you have applied the fondant icing over the cake.50 grams bittersweet chocolate, 1 teaspoon almond oil
Faux fondant icing
- Combine the powdered sugar, lemon juice, and oil. Drop by drop, add hot water and stir until you get a shiny and smooth icing. It should be smooth but not runny.250 grams powdered sugar, 2-3 tablespoon lemon juice, 1 teaspoon almond oil
Decoration
- With a hot wet large knife, quickly spread the icing over the apricot layer. Use a hairdryer if the icing is cooling too quickly. You should have a smooth and shiny surface.
- Pipe four circles onto the cake with the melted chocolate.
- Using a wooden skewer or a toothpick to create the web design. Starting from the center of the cake superficially run the skew to the edge of the cake. Then do the opposite direction.
- Cover the sides of the cake with the reserved buttercream and coat with the sliced almonds.100 gram sliced almonds


Great recipe, I use to make my grandma’s recipe which is more complex and very complex from a perspective of the technique. I just want to add to your recipe that is a Hungarian cake actually, and would be very nice if you would name it as its origin, and not Austrian.
Thank you for your recipe!
Hi Gabriel, Thank you so much for your kind words and high marks on the cake! I really appreciate your thoughtful feedback about acknowledging the true Hungarian origin of the Esterházy Torte. You’re absolutely right, and I’ve updated the post to properly reflect that this cake originates from Hungary.I have great respect for culinary cultural heritage, and I’m grateful you took the time to share this with me. It’s important to honor the authentic roots of these classic recipes. And I would love to learn more about your grandma’s recipe. Thanks again for helping make the post more accurate!